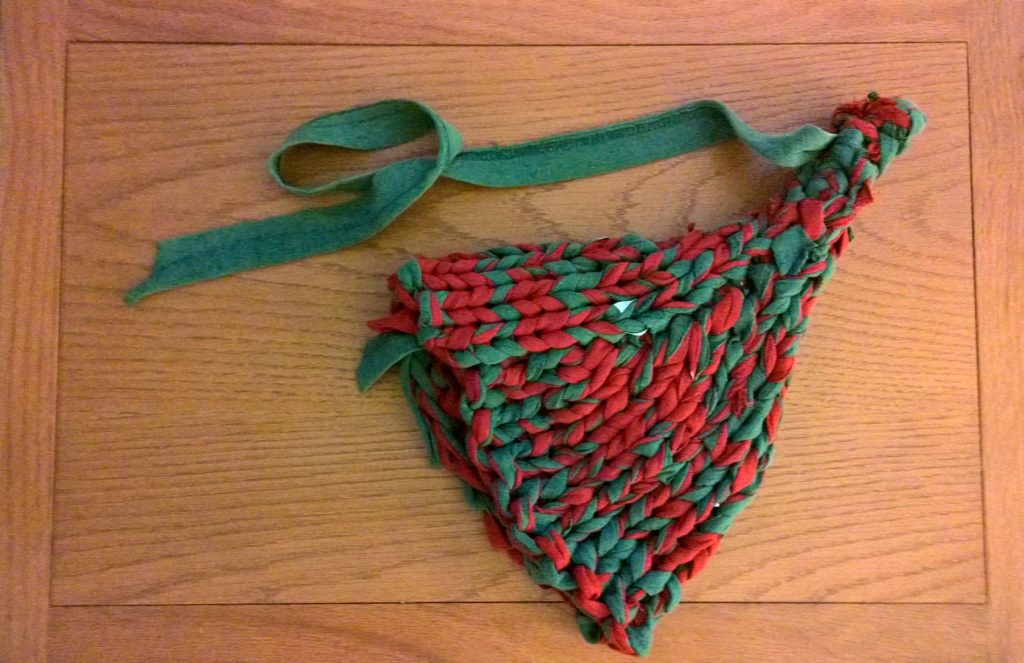
After randomly buying a pair of mahoosive 20mm diameter (US 35 = 19mm) needles, I’d been on the lookout for something to knit with them (both materials and pattern ideas).
A couple of weeks before Christmas 2017, I noticed that my 2010 Old Navy Christmas T-shirts (bought for a buck or so in January 2011 ;D) were rather aged and must have… ahem… shrunk or something. Suffice to say – they wouldn’t be worn again.
Recycle time!
Materials
- Approx 2 medium/large sized T-shirt’s worth of “yarn” in contrasting, festive colours
- 20mm diameter knitting swords (this is knit flat, but easy enough to translate to DPNs/circulars if you have ’em)
Making the yarn
Starting at the bottom hem of the T-shirt, I cut it into a continuous strip of material about 10-20mm (~1/2-3/4 inch) wide. With my arm through the neck hole and hand sticking out of the “bottom” of the shirt, I was able to quite effectively continuously cut the strip while rotating the shirt on my arm. Stopping when I reached the sleeves.
Accuracy wasn’t really the order of the day – the width was a little variable and I don’t recall how long the “yarn” actually ended up!
Using the yarn
I recommend knitting with two contrasting “yarns” at once for variegation and strength.
I first made the hat with one strip of yarn and made stripes by switching between the green and red at intervals. This is the one I posted in the blog here. After a couple of days wear, it became obvious just how old the fabric was – it had lost it’s integrity and stretched out of shape very quickly. I unravelled the lot, and did the hat again, this time knitting with both red and green strand at the same time.
It created a the much denser and more visually pleasing effect in the pictures here. It’s currently holding it’s shape ok!
Run out of “yarn”?
Don’t worry, just knot a new piece on and continue. This happened a couple of times (like I say above, no idea how long the yarns were, just chopped those shirts up and cracked on!). The rough and ready feel to the hat I think is cool 🙂
Sizing
The pattern described fits my head ok. I’m roughly 57-58cm (hat sizes UK 7 1/8, US 7 1/4). It stretches a bit. Adjust as you see fit. It’s so quick to knit that you can undo and reknit in no time to adjust.
One note is that I have no hair! It might require another one or two rows before starting to reduce to make sure it has enough depth for those more folicularly blessed.
Go!
- Cast On 24 stitches (I used standard LongTail, seems stretchy enough).
- Knit Row
- Purl Row
- Repeat 2. and 3.
- Repeat 2. and 3.
- (Repeat 2. and 3. again as many times as you want to adjust depth).
Symmetric reduction
- [k6, k2tog] * 3 (21 sts)
- Purl
- [k5, k2tog] * 3 (18 sts)
- Purl
- [k4, k2tog] * 3 (15 sts)
- Purl
- [k3, k2tog] * 3 (12 sts)
- Purl
Asymmetric reduction
- k4, [k2tog] * 2, k4 (10 sts)
- Purl
- k3, [k2tog] * 2, k3 (8 sts)
- Purl
- k2, [k2tog] * 2, k2 (6 sts)
- Purl
- k1, [k2tog] * 2, k1 (4 sts)
- Knit
- Purl
- Repeat 8. and 9.
- Optional: repeat 10. as many times as you’d like if you want the “spike” longer. Mine was just one.
- Bind Off (just did a standard knit bind-off), do not cut the working end.
Finishing
You will now have a weird looking asymmetric triangle. Time to turn it into a weird looking cone!
You want a nice long working end from the bind-off, especially if you want the “streamer” coming out of the top (this was a lucky chance and I prefer it to a bobble or suchlike!).
If using double-stranded yarn, choose which one you will use to close the hat (and be the streamer if you want it) and weave the other one into the bound-off edge to secure.
Using your chosen length of yarn from the bind-off, mattress stitch the sides together from bottom to top of the hat to form the hat and it’s spike. I used my fingers to pass the yarn through the stitches. Secure the end of the yarn by knotting it back on itself. Leave a streamer if you like. I like.
Terminology
- kn: knit n stitches (e.g. k6 = knit 6 stitches).
- k2tog: knit two stitches together
- [blah] * n: do “blah” n times. (e.g. [k4, k2tog] * 3 = “knit 4 stitches, then knit two together. Repeat this 3 times).
Feel free to use the pattern as you wish, but a credit would be nice 🙂
Original blog post here.

